Connect Domain to GoogieHost Free Hosting 2026 (8 Steps)


Connecting your .com domain to GoogieHost is simple when you follow the right steps. This guide is for people who already own a domain and want to connect it to their GoogieHost free hosting account.
Quick answer: To connect an existing domain to GoogieHost free hosting, create your account, add the domain in DirectAdmin, copy GoogieHost’s nameservers and update them at your domain registrar. Then wait for DNS propagation and check that SSL is active.
We will walk you through each step with screenshots, from the free order to the nameserver change, DNS propagation and the HTTPS check. By the end of this guide, your domain will be live on GoogieHost and will open over HTTPS. You do not need to buy another domain to get started.
What You Need Before Connecting Your Domain
Keep these essentials ready, so you can add your domain and update its settings without confusion. Your domain can come from any registrar, such as GoDaddy or Namecheap, and the process is the same.
- An active GoogieHost free hosting account.
- A registered .com domain that you own and that has not expired.
- Access to your GoogieHost DirectAdmin panel to add and manage your domain.
- Login details for your domain registrar, the company where you bought your domain.
- Permission to change your domain’s nameservers in its settings.
- The GoogieHost nameservers, or the hosting IP address, for your account.
- Time for DNS changes to take effect, which can take up to 48 hours.
You can use your existing domain. You do not need to buy another one or transfer it to GoogieHost.
Don’t Have a Domain Yet?
If you do not own a domain, read our guide on how to get a free .com domain and register one first. GoogieHost does not register .com domains for free, so you will need to buy one from a registrar or use a free-domain offer from another provider. You can also start with a free subdomain, and our list of the best free subdomain hosting providers shows how the options compare. Once your domain is registered, come back here to connect it.
Step-by-Step: Add Your Domain and Update Nameservers
Follow these steps to connect domain to GoogieHost free hosting. You will add your existing domain to your hosting account, update its nameservers and wait for the DNS changes to take place.
- Step 1: Visit the official GoogieHost website and open the Free Hosting page.
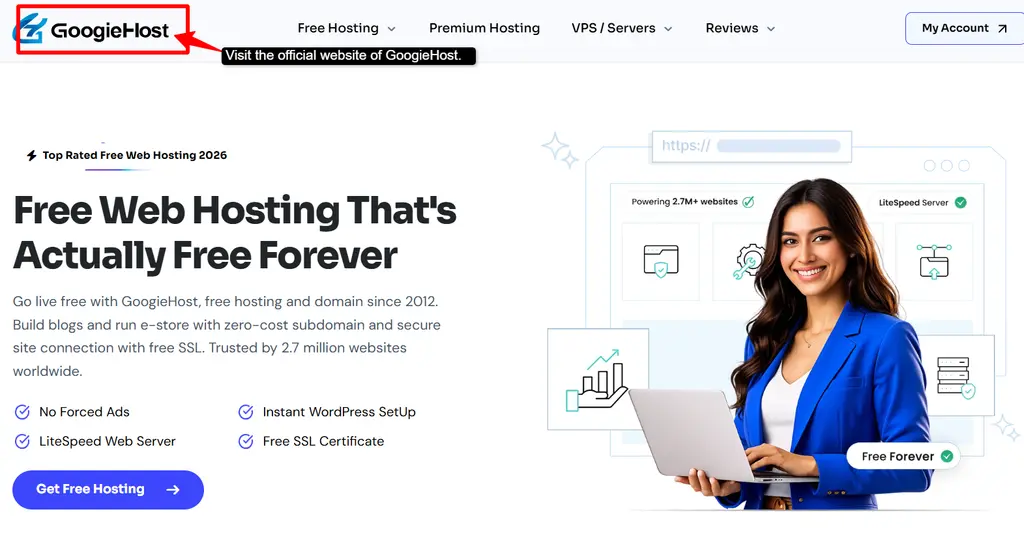
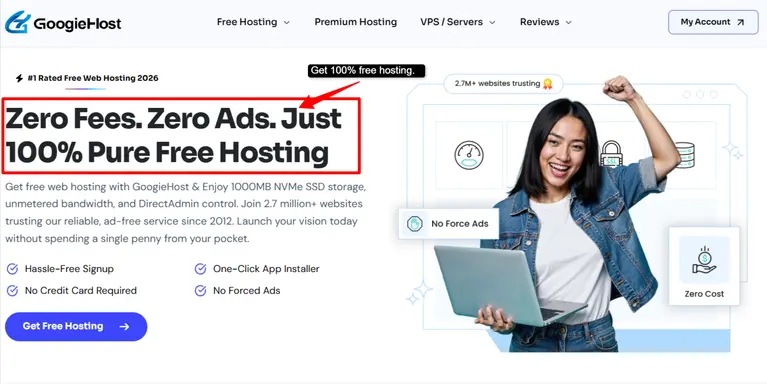
- Step 2: Click Get Free Hosting or Get Started Free. No card is needed to begin signing up.
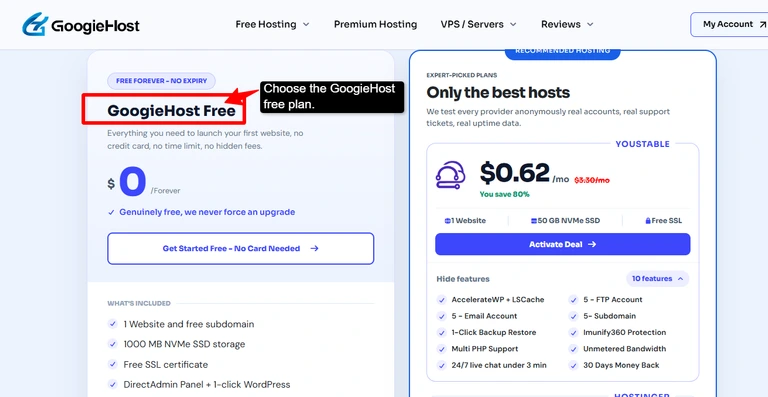
- Step 3: On the plans page, select the GoogieHost Free plan and start the process. Make sure you pick the free plan and not one of the paid hosting plans.
- Step 4: Choose I will use my existing domain and update my nameservers, then enter your domain in the field. This option sits above the one for a GoogieHost subdomain.
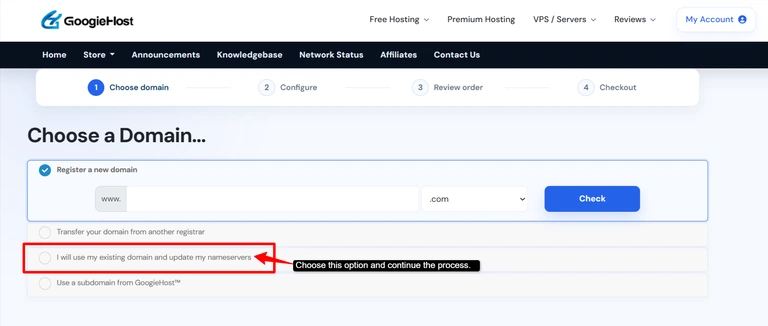
Note: Enter your .com domain, such as example.com. Do not include https://, www. or a path such as /blog.
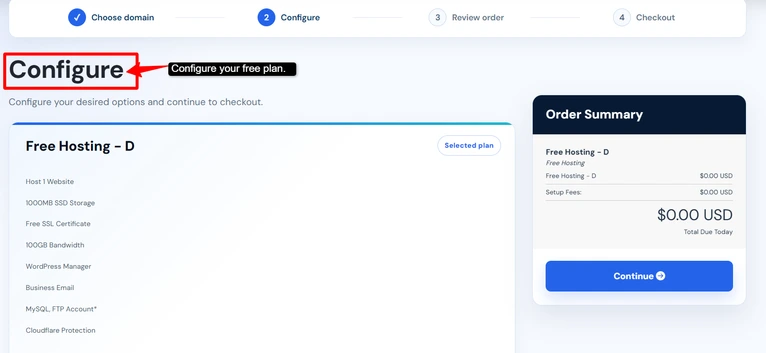
- Step 5: The Free Hosting – D plan is selected and the total shows $0.00. It includes 1000MB SSD storage, a free SSL certificate and a business email account. Click Continue.
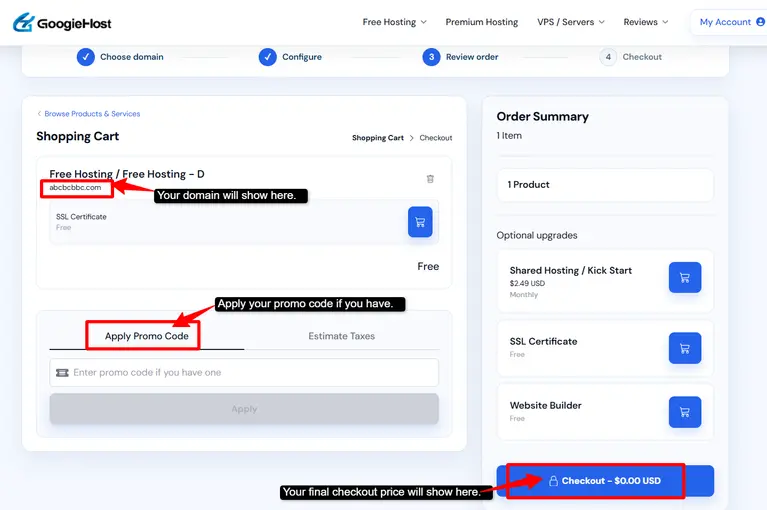
- Step 6: Review your order. Your domain and the free SSL certificate are listed in the cart. If you have a promo code, apply it here, then click Checkout.
Already Have a GoogieHost Account? Add Your Domain Here
If you already have a GoogieHost account and only want to add a new domain, you do not need to place a new order. Log in to DirectAdmin, open Domain Setup and add the domain there. Then continue with the nameserver steps below.
- Step 7: Enter your personal details to create your account. You can set your own password, or GoogieHost will generate one for you.
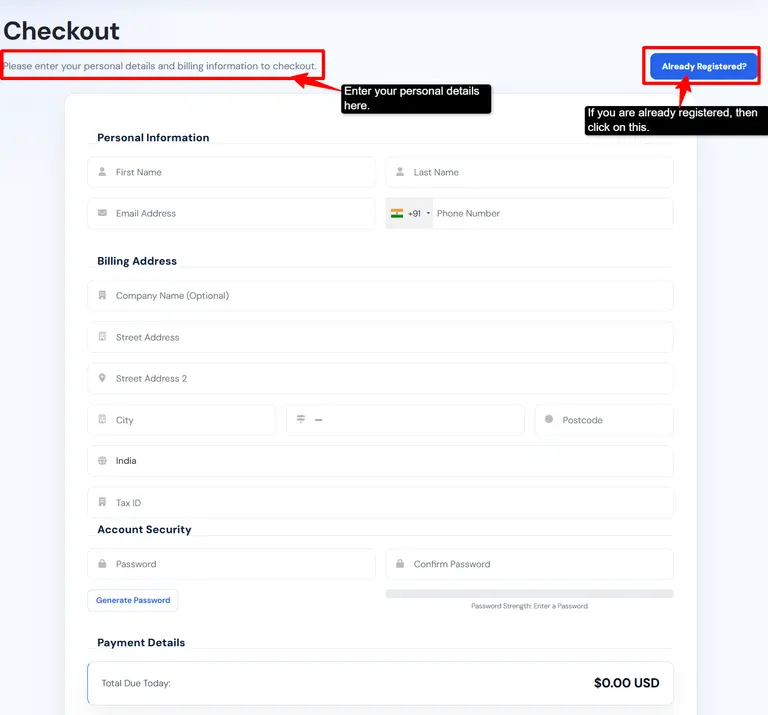
Note: If you already have a GoogieHost account, click Already Registered and log in instead. Otherwise, use a valid email address, because the verification email is sent to it.
- Step 8: You will reach the order confirmation page with your order number. Once the order is approved, you get access to the client area, usually within minutes or hours.
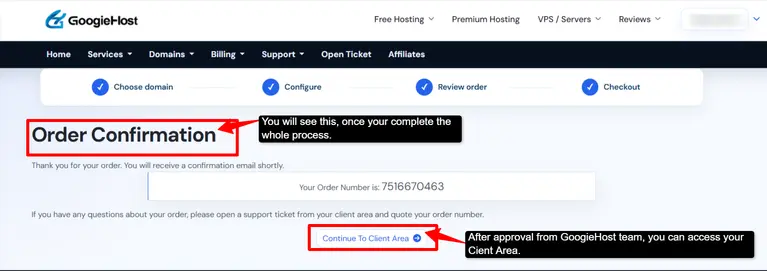
Note: Complete any email verification that GoogieHost sends you, and wait until your hosting service is active before you continue.
After the order is complete, copy the nameservers that GoogieHost gives you for your account. Log in to your domain registrar, replace the existing nameservers with the new ones and save the changes. Then wait for DNS propagation to complete before you check your website.
Once propagation is done, log in to DirectAdmin and confirm that your domain appears under Account Manager > Domain Setup. Then upload your website files or install WordPress, check your SSL certificate and open your domain with https:// to confirm that it loads securely. If your site is hosted elsewhere right now, our list of the best free website migration services shows how to move it across.
Nameserver vs A Record: Which One Do You Need?
With the nameserver method, you do not need to change the A record. An A record is a DNS record that maps your domain to your hosting server’s IP address. Updating it at your current DNS provider is the other way to point your domain to hosting. This guide uses the nameserver method.
Nameserver Method vs A-Record Method
| Point of Difference | Nameserver Method | A-Record Method |
|---|---|---|
| What you do | Replace your existing nameservers with GoogieHost nameservers. | Keep your nameservers and update the domain’s A record to GoogieHost’s hosting address. |
| Who manages DNS afterward | GoogieHost | Your existing DNS provider |
| Difficulty | Easy | Medium |
| Best for | New websites with no email or CDN setup | Domains with an existing email or CDN setup |
| Email impact | Copy your MX records into GoogieHost’s DNS, or email stops working | MX records stay unchanged |
| Propagation time | Usually 1 to 24 hours, sometimes up to 48 hours | Depends on the TTL, often faster than a nameserver change |
These are two different ways to point your domain to hosting. You do not need to follow both.
Which Method Does This Guide Recommend?
If your domain has no email running on it, use the nameserver method. It is the simplest setup and the one this guide follows. If you use Google Workspace, Zoho Mail or Cloudflare, use the A-record method, so your existing email and DNS setup stays as it is.
Note: If your domain already uses an external email service, copy its required DNS records into GoogieHost before you switch nameservers. Or keep your current nameservers and use the A-record method to preserve your existing DNS setup.
How to Connect a Domain Without Changing Nameservers (A-Record Method)
Yes, you can connect your domain to GoogieHost by updating the required DNS records while keeping your current nameservers. This points your website to the hosting server without moving DNS management to GoogieHost. After you add your domain in GoogieHost DirectAdmin, follow these steps:
- Find your hosting server’s IP address in your account details, or ask GoogieHost support to confirm it.
- Open the DNS settings at your current DNS provider.
- Update the A record for @ or example.com to point to your GoogieHost hosting IP address.
- Set the www CNAME record to example.com, or update its A record to the same hosting IP.
- Save your changes, wait for DNS propagation and verify SSL.
This method is useful when you want to keep DNS or email managed elsewhere. Leave your existing email records, including MX and email-related TXT records, unchanged.
Choose one of these two options. You do not need to do both.
- Option 1, switch nameservers: Copy your existing DNS records, including MX, SPF, TXT and DKIM records, into GoogieHost’s DNS. Then switch to GoogieHost’s nameservers.
- Option 2, keep your nameservers: Leave the nameservers as they are and update only the A record to point to GoogieHost’s hosting IP. Your MX, SPF, TXT and DKIM records stay unchanged.
Domain Connection Not Working? Common Problems and Fixes
If your domain does not work after setup, use the checks below to find what needs fixing. Start with DNS, then check SSL and your website settings, in that order.
Domain Still Shows the Old Website
This can happen because of DNS caching, ongoing propagation, old DNS records or cached data on your browser or device.
- Allow time for recent DNS changes to take place.
- Check for old DNS records pointing to your previous host.
- Clear your browser cache or try a private window.
- Test on another device or network to compare the result.
Website Shows “DNS_PROBE_FINISHED_NXDOMAIN” or “Server Not Found”
Check these details before making further changes:
- Are the nameservers correct for your chosen connection method?
- Are the required DNS records correct at your active DNS provider?
- Is the domain added to your GoogieHost hosting account?
- Is the domain spelled correctly?
- Have you saved all the changes?
SSL Is Not Working
Confirm that DNS is working before you troubleshoot SSL. The correct sequence is:
- DNS settings work.
- The domain resolves to GoogieHost.
- The SSL certificate is issued and configured.
- The website opens over HTTPS.
Once your domain resolves correctly, check the certificate status in DirectAdmin and verify that your website opens with https:// without a certificate warning.
www Works, but the Root Domain Does Not
If www.example.com opens but example.com does not, or the other way around, the DNS record for the root domain (@) or for www is usually missing or wrong. The two names can even use different DNS records, so one may work while the other points to the wrong server.
Check that the root domain’s A record points to your GoogieHost hosting IP. Then confirm that www uses a CNAME pointing to example.com, or an A record pointing to the same hosting IP.
You can also set up a redirect from www to the non-www version, so visitors land on one address.
Domain Is Connected but the Website Is Not Loading
If you see a 403, 404 or 500 error, check the following:
- 403 Forbidden: Set the correct document root and check that the folder has a homepage file such as index.html or index.php.
- 404 Not Found: Make sure your website files are in the document root folder and that the domain is added to the right folder in DirectAdmin.
- 500 error: Check your WordPress or other site configuration and your .htaccess file for mistakes.
- Default page or “Index of /”: Upload your homepage file, index.html or index.php, to the document root folder.
If none of these errors match, check that DNS points to the correct GoogieHost hosting server and that SSL is not causing a certificate warning. If the problem remains, contact GoogieHost support with your domain name, the error you see and the checks you have already completed.
Can I Connect a Domain I Got for Free to GoogieHost?
Yes, you can connect a domain to GoogieHost if it is registered under your control and you can change its nameservers or DNS records. Whether you paid for the domain or received it through an offer, you can connect it to your GoogieHost free hosting account without buying another domain.
A free .com domain such as example.com is not the same as a free subdomain such as yourname.whf.bz. GoogieHost’s free address option gives you a subdomain, not a free .com registration. You can read more on the free domain and hosting page.
Frequently Asked Questions
Do I need to buy a new domain?
No. If you already own a domain, you can connect it to your GoogieHost free hosting account as it is.
How do I change my domain’s nameservers?
Log in to your domain registrar, select your domain and open its Nameservers settings. Choose the custom nameservers option, replace the existing entries with the exact nameservers provided by GoogieHost and save your changes. Before switching, copy any DNS records needed for existing email or other services to your new DNS provider.
How long does DNS propagation take?
Nameserver changes usually take 1 to 24 hours and sometimes up to 48 hours to take effect worldwide. The time depends on the TTL, the setting that tells DNS servers how long to cache old records before checking for new ones. During this time, your website may open on one network but not on another. Use a DNS propagation checker such as DNSChecker or WhatsMyDNS, enter your domain, select the NS or A record type and check whether servers worldwide show your new GoogieHost values.
Can I connect multiple domains or a subdomain to GoogieHost?
You can connect a custom domain or use a free GoogieHost subdomain such as yourname.whf.bz or yourname.cu.ma. The free plan lists one website, so check your account limits or confirm with GoogieHost support before you add more domains.
What should I do if my domain is not working after changing nameservers?
Check that the nameservers match GoogieHost’s values exactly, with no typos or extra spaces, and that you saved the changes. Then confirm in your registrar that the update is not shown as pending and that domain lock and DNSSEC are not blocking the change. Next, confirm that your domain is added in DirectAdmin and that its DNS records point to the correct hosting server. Verify the nameservers with nslookup or dig, and if the change is recent, allow time for propagation and test on another network.
Does GoogieHost provide SSL for connected domains?
Yes. GoogieHost includes a free SSL certificate with its hosting. First, confirm that your domain resolves to the correct GoogieHost server. Then open the SSL certificates section in DirectAdmin and request or configure the free certificate if needed. Finally, open https://yourdomain.com and confirm that it loads without a certificate warning.
Can I connect a domain from any registrar?
Yes. The steps are the same for any registrar, as long as it lets you change the nameservers or the DNS records of your domain.
Will my email stop working when I change nameservers?
It can, if your email records are not copied to GoogieHost’s DNS. Copy your MX, SPF, TXT and DKIM records before you switch, or use the A-record method and keep your current nameservers.
Your Domain Is Connected: What’s Next?
Connecting your domain takes four steps: add the domain in DirectAdmin, update the nameservers, wait for DNS propagation and verify SSL. Your website should then load over HTTPS, so install WordPress or upload your files. If the domain does not open, go back to the troubleshooting section above.
This guide recommends the nameserver method. If you want DNS or email managed elsewhere, keep your current nameservers and update the A record instead. Choose one method, and you do not need to do both. Once your website loads correctly over HTTPS, your setup is complete. To see what else is on offer, compare the best free web hosting providers.


Table of Contents
- What You Need Before Connecting Your Domain
- Step-by-Step: Add Your Domain and Update Nameservers
- Nameserver vs A Record: Which One Do You Need?
- How to Connect a Domain Without Changing Nameservers (A-Record Method)
- Domain Connection Not Working? Common Problems and Fixes
- Can I Connect a Domain I Got for Free to GoogieHost?
- Frequently Asked Questions
- Your Domain Is Connected: What’s Next?